iOS configurations
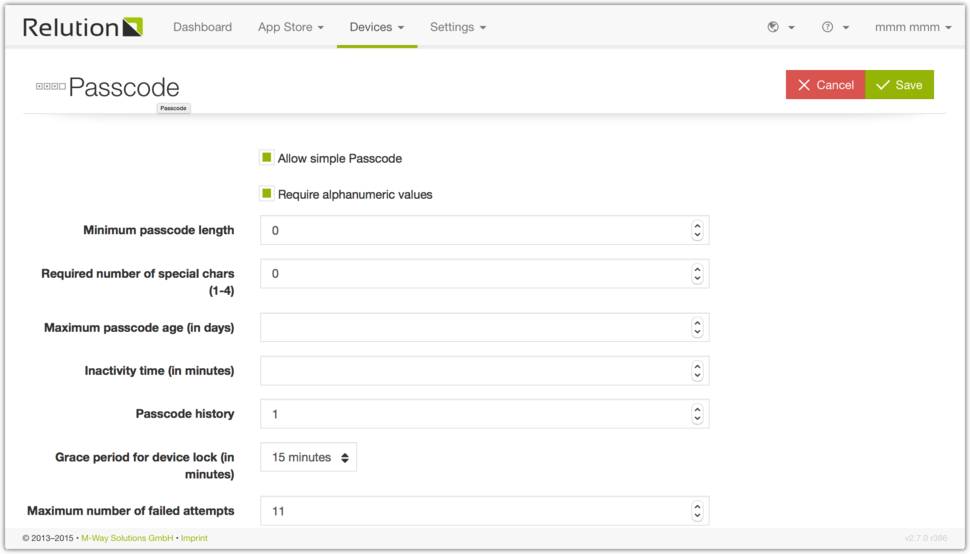
Passcode
The iOS passcode policy forces the user to set a specific password according to the passcode settings defined by the administrator. There are multiple password strengths you can define for the password the users have to set. The minimum passcode quality is the first step. Besides that you can define the minimum length, passcode age, the time to display lock, passcode history and the number of failed attempts until the device is completely wiped and all data is deleted.
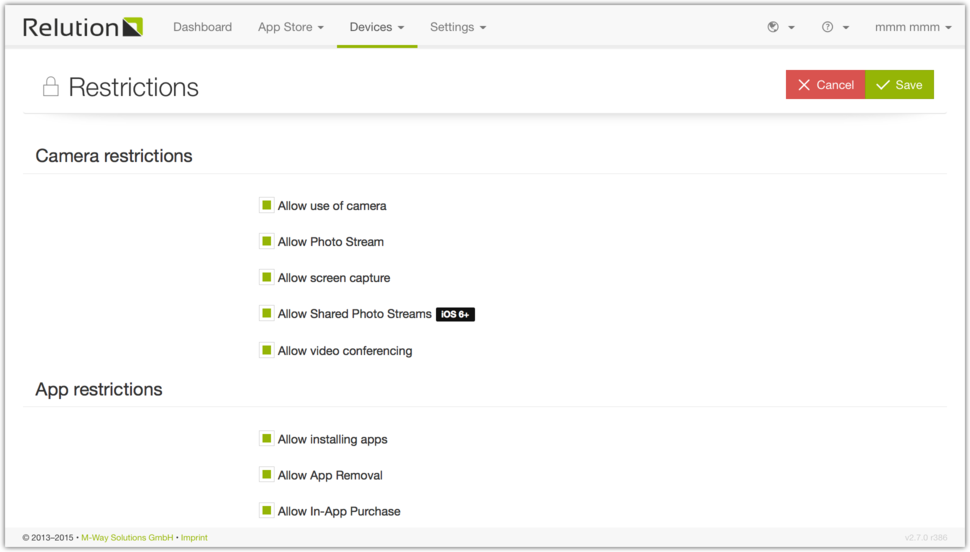
Restrictions
The restrictions configuration is used to allow or disallow some features of the operating system. There are general restriction, app restrictions and browser restrictions. For example it is possible to disable the camera on the device in the sector “general restriction”. All applications which try to access the camera will not be allowed to use it anymore if the checkbox “Disable camera” is checked.
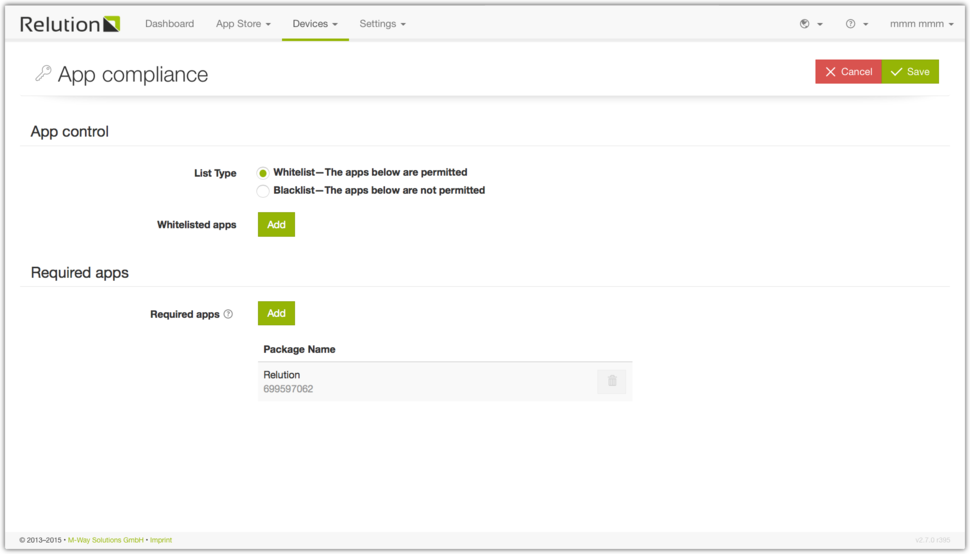
App Compliance
The App Compliance is used to set a White-/Blacklist on your devices. Those lists will make sure that your users only use the Apps you allowed them to. You can also set a list of Apps that are required to be installed on your devices.
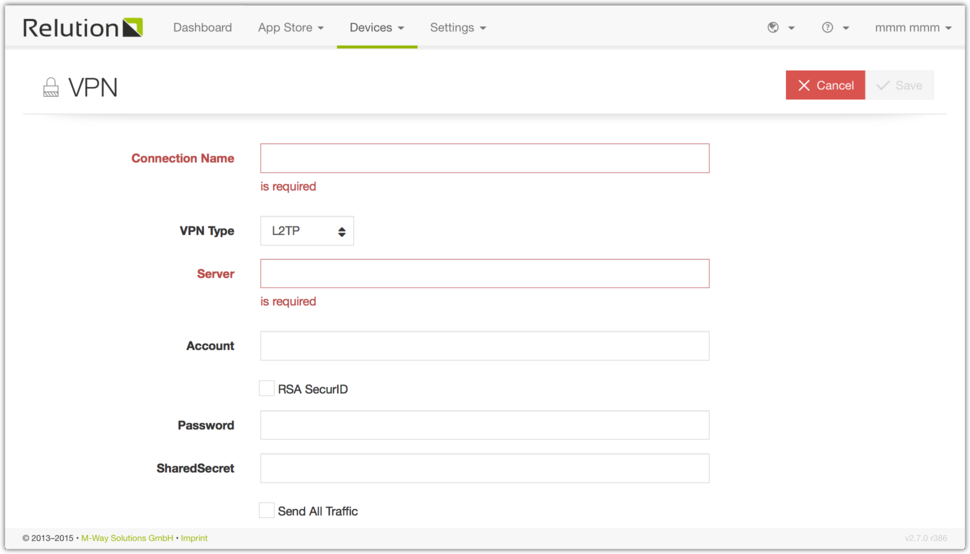
VPN
The VPN configuration is used to enable VPN usage on the enrolled devices, configure the VPN network and set credentials. For example you can name the connection and set the VPN type.
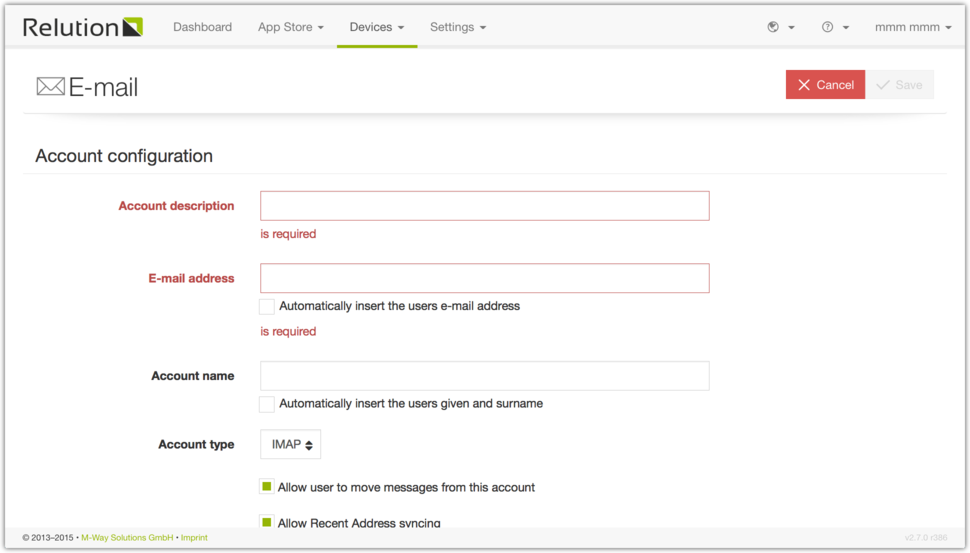
Here you can configure E-mail accounts and enable them. You can fill in the E-mail address, an account description or name as well as choose IMAP or POP as a type. You also can set the incoming and outgoung mail server configurations like passwords, hostnames and portnumbers.
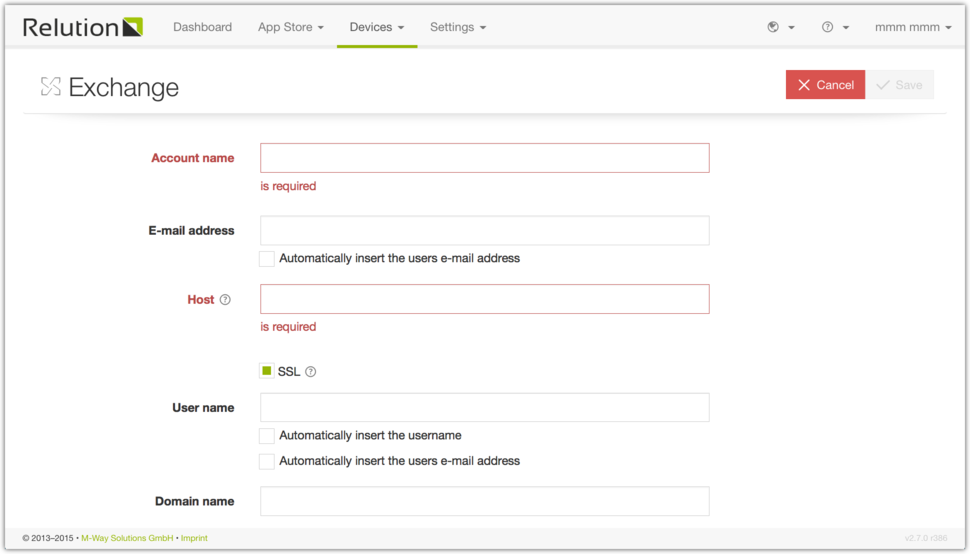
Exchange
Here you can enable and configure Exchange accounts and set rights and authentification settings.
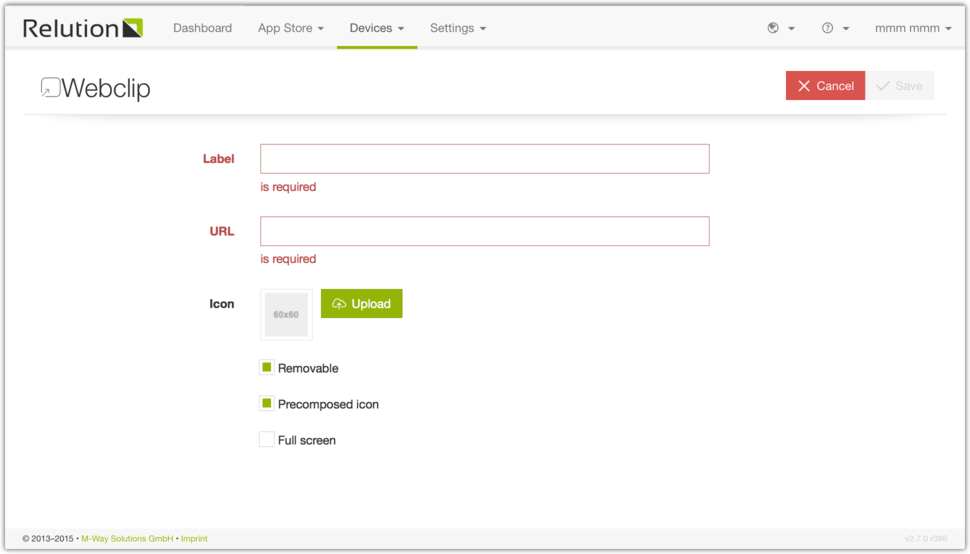
Webclip
Here you can define iOS shortcuts to a specific website that can be created on the iPhone web browser and stored on the iPhone’s home screen. You can upload an icon, set the label and the url to which the webclip refers to.
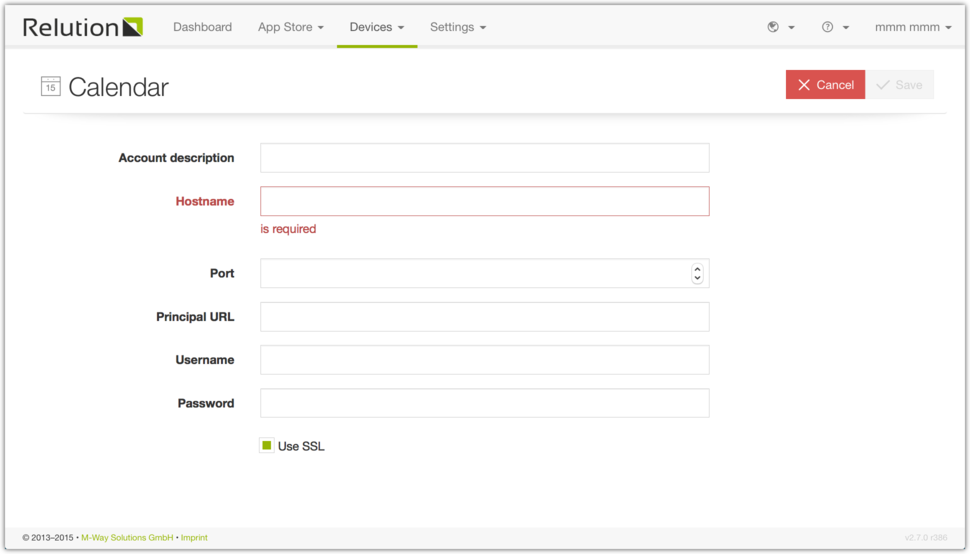
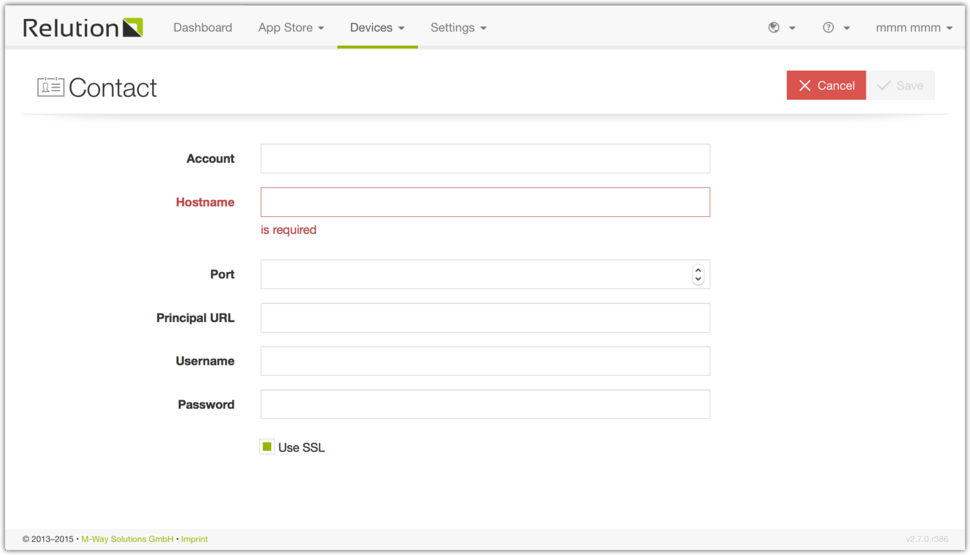
Calendar
In the Calendar configuration you can manage CalDAV accounts and their authentification settings.
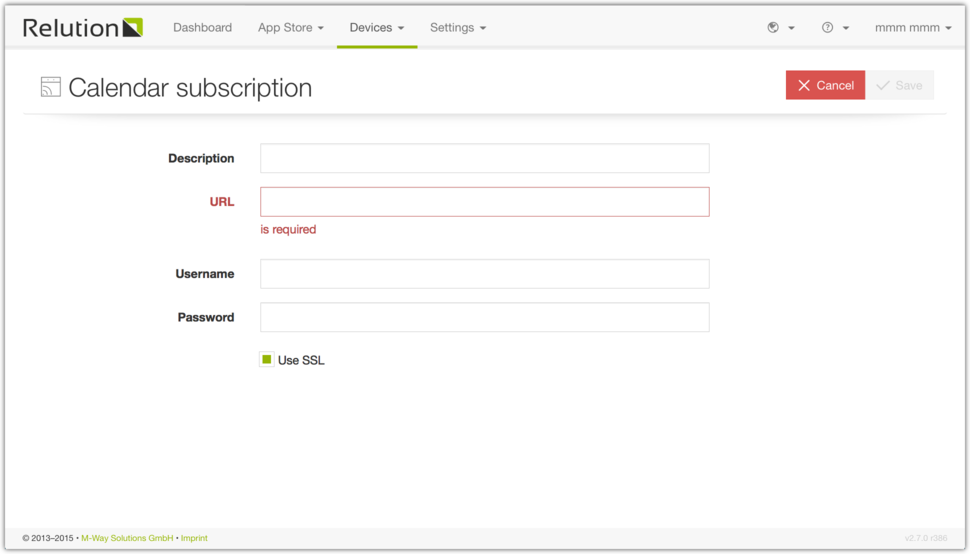
Calendar subscription
The Calendar subscription configuration is used to manage calendar subscriptions.
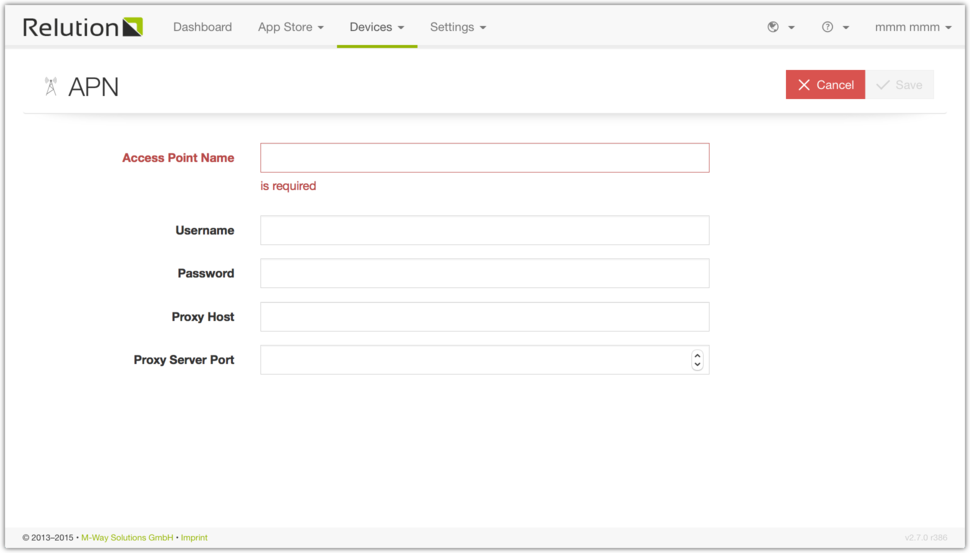
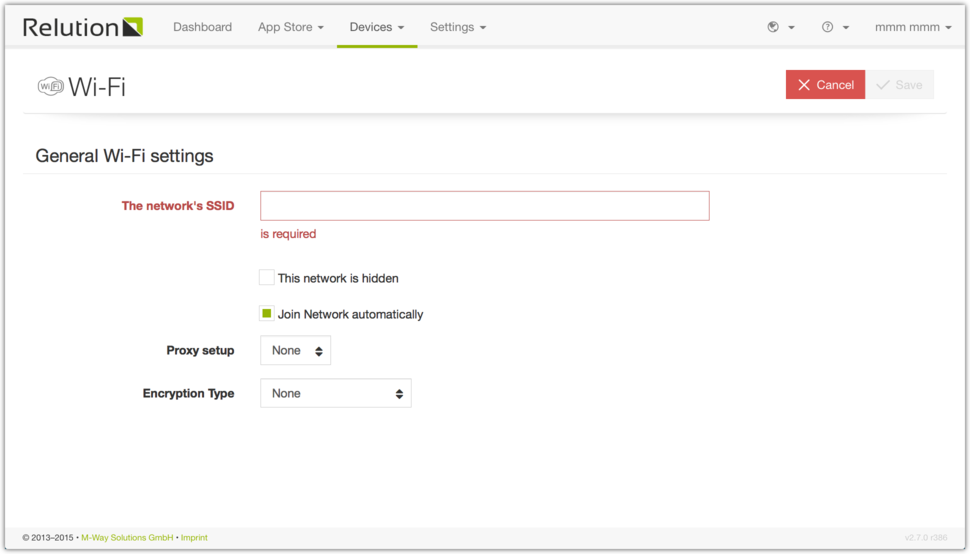
Mobile network
The “Mobile network” configuration manages the Access Points configurations such as Proxy Server URL and Proxy Server Port.
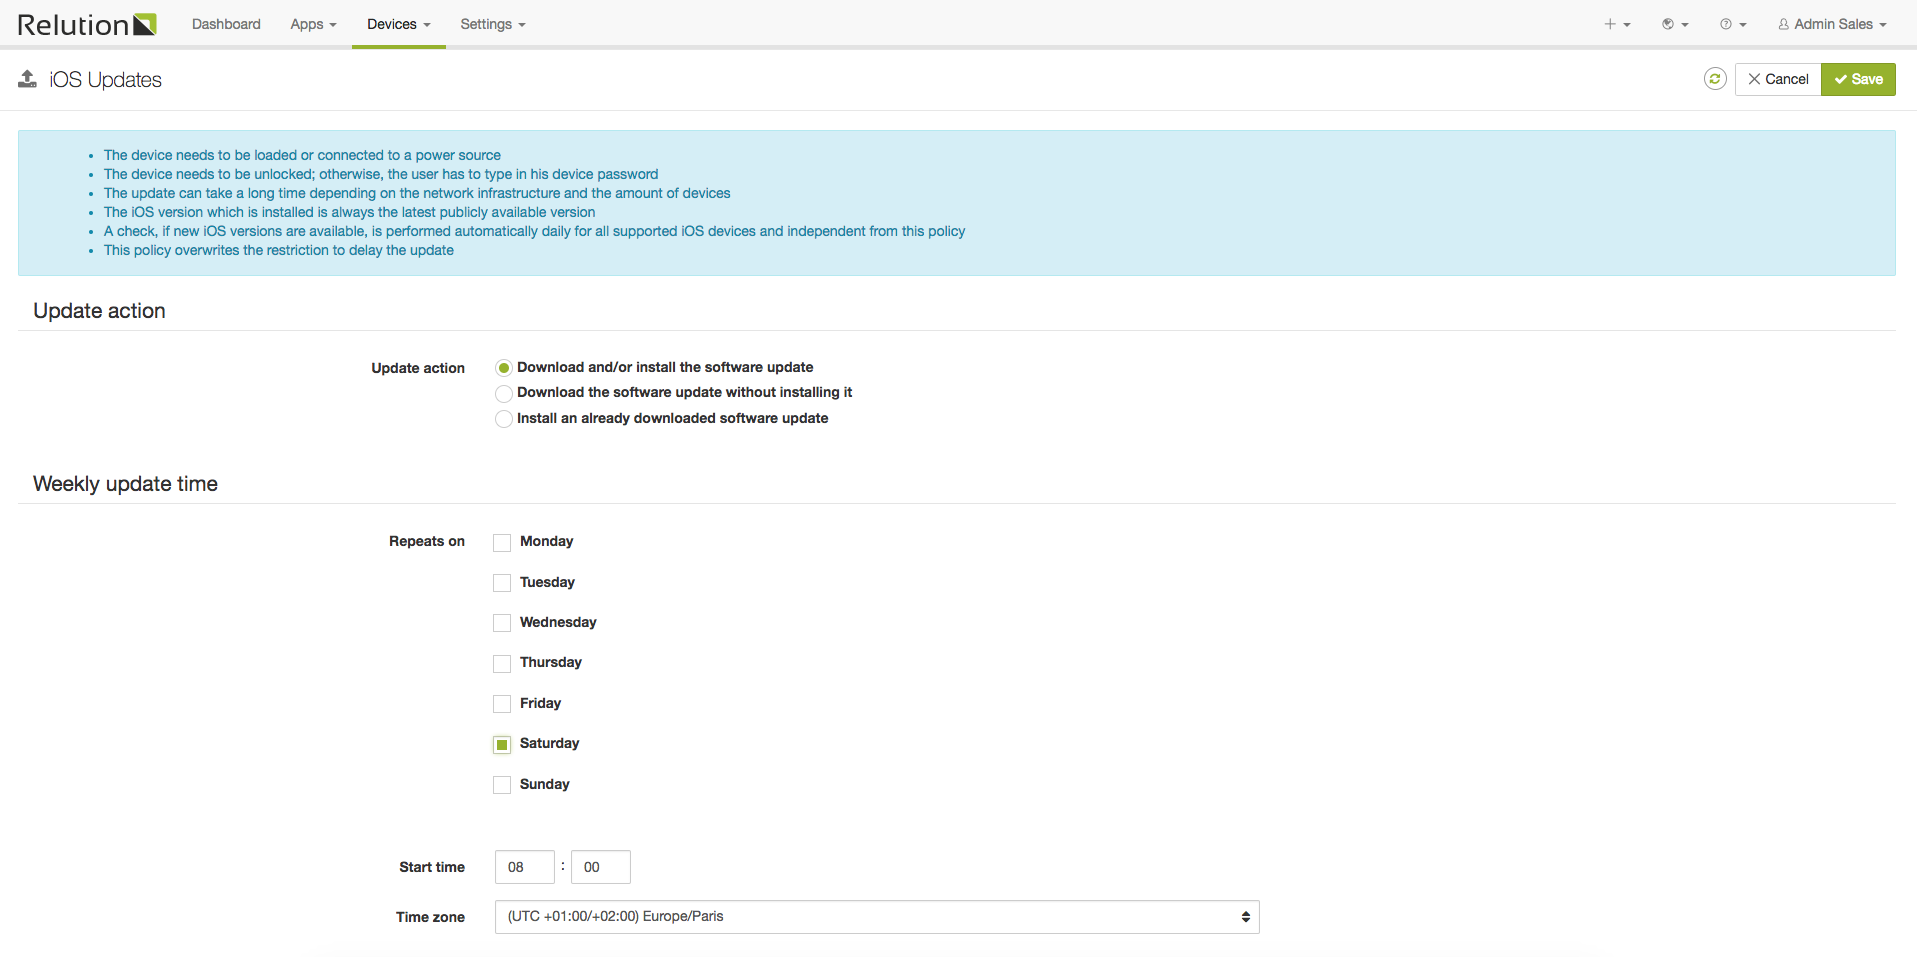
iOS Updates
This configuration manages parameters to configure the scheduling of automatic iOS updates.
The following parameters can be configured:
-
Update action (see Install Update action)
-
Repeats on: The days updates should be performed
-
Start time: The time the updates should be performed on the specified days
-
Time zone: The time zone to be used with respect to the start time
Starting from the server start, it is checked every hour wether an update is to be carried out on the basis of the specified parameters. If the specified time is reached, an Install Update action with the specified update action will be applied for all assigned devices which have an update available.
The assigned iOS devices must:
|
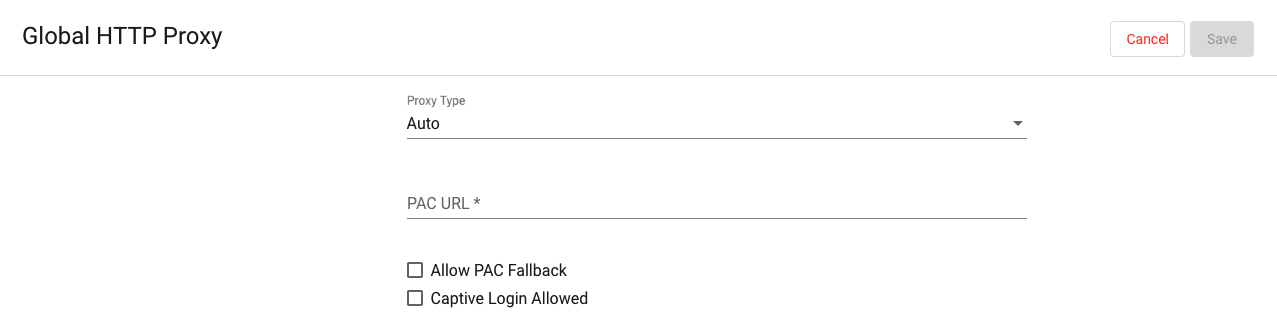
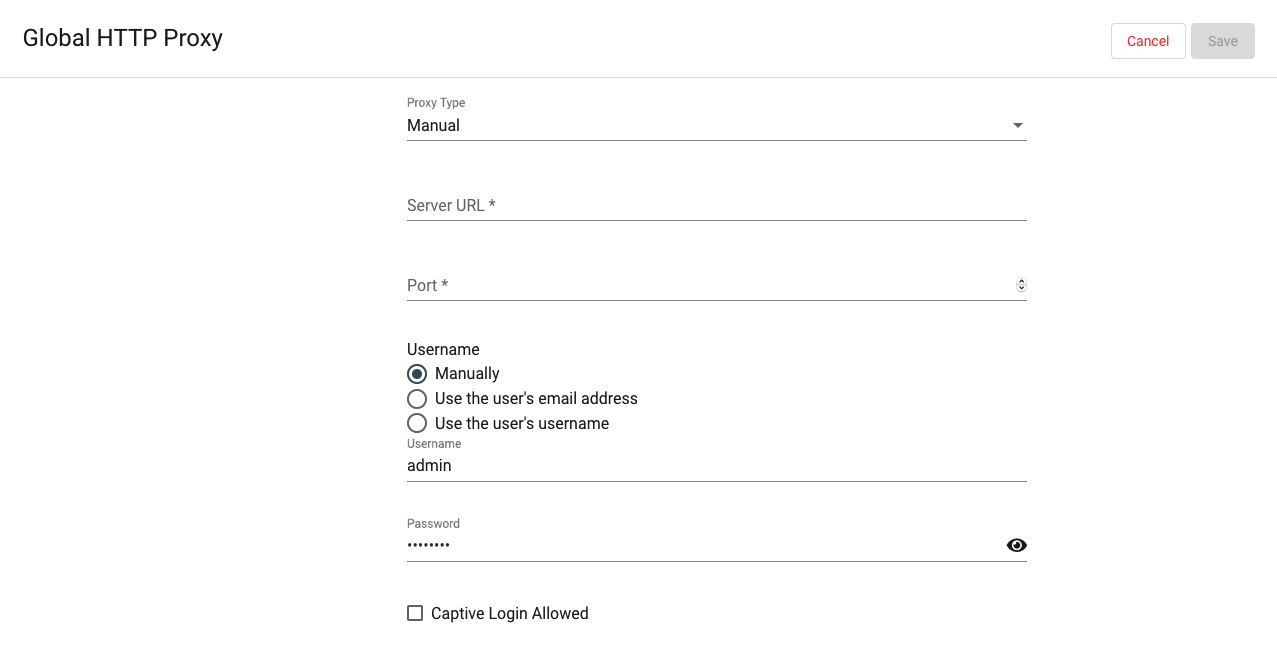
Global HTTP Proxy
It is possible to select the proxy type between Auto and Manual. Set proxy type to "Auto" to retrieve the correct settings for the network from a Proxy Auto-Configuration URL (PAC URL).
Set it to "Manual" to specify the proxy settings as part of the policy configuration instead. If the proxy requires user authentication, you can specify the username here. If the same username is used for all users, select "Manual" and enter the required credentials. Otherwise select E-Mail or Username to automatically use the corresponding values of the user associated with the enrolled device.
Single App Mode
Here you can define an app that will be run in Single App Mode, so that the user cannot leave the app.
First, select an app you want to show in Single App Mode:
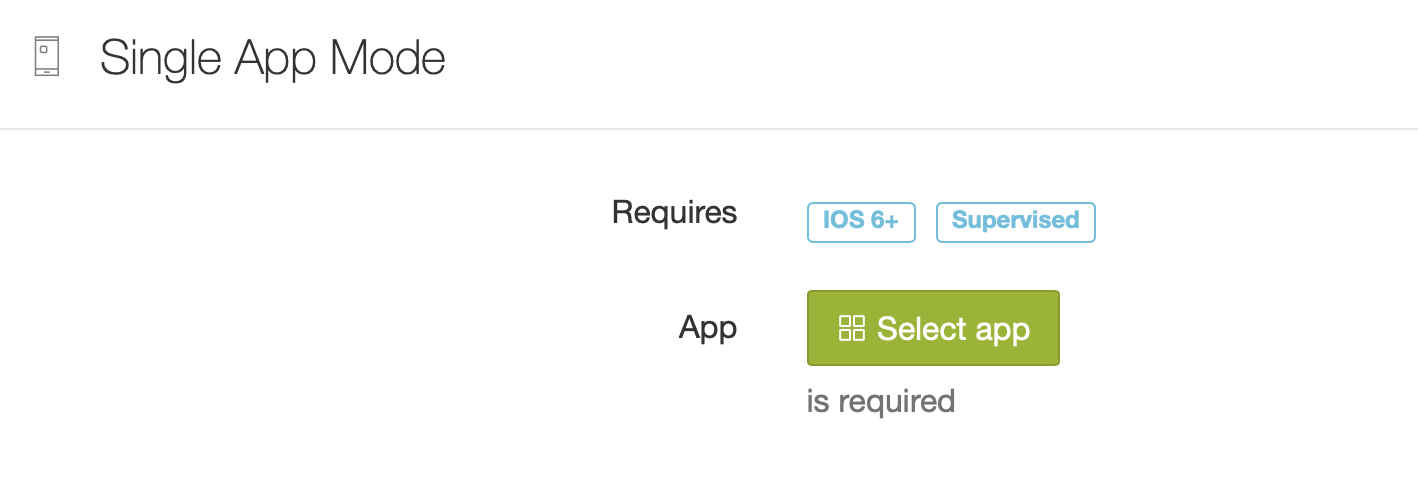
Then, select the options for this mode (additional restrictions when showing this app):
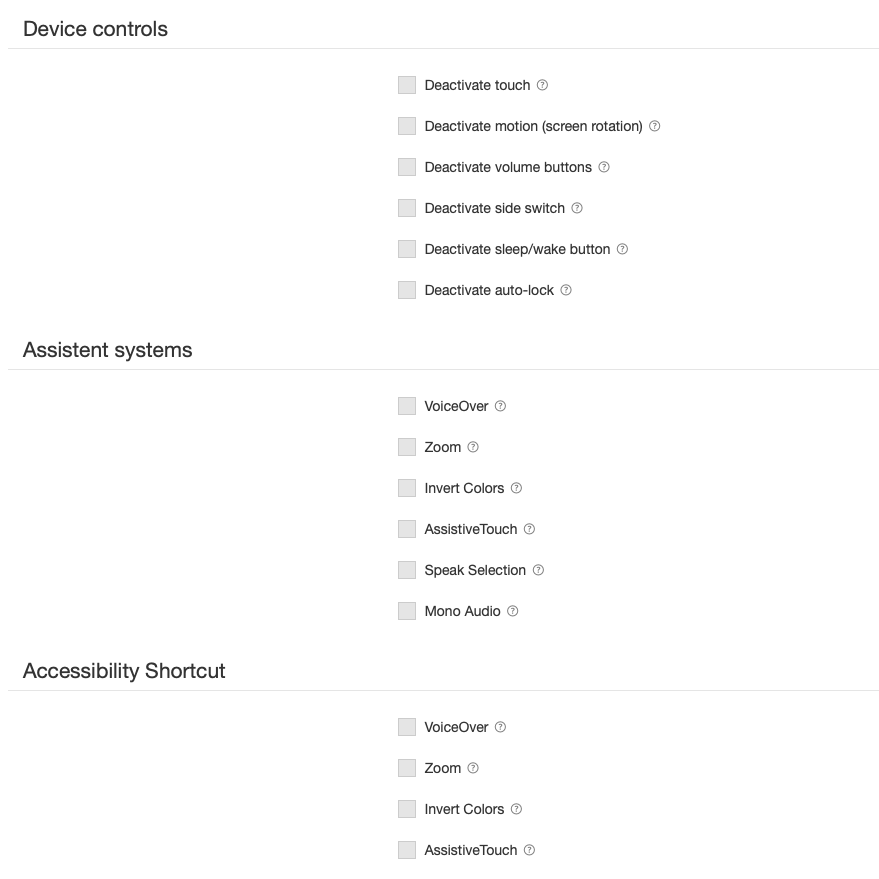
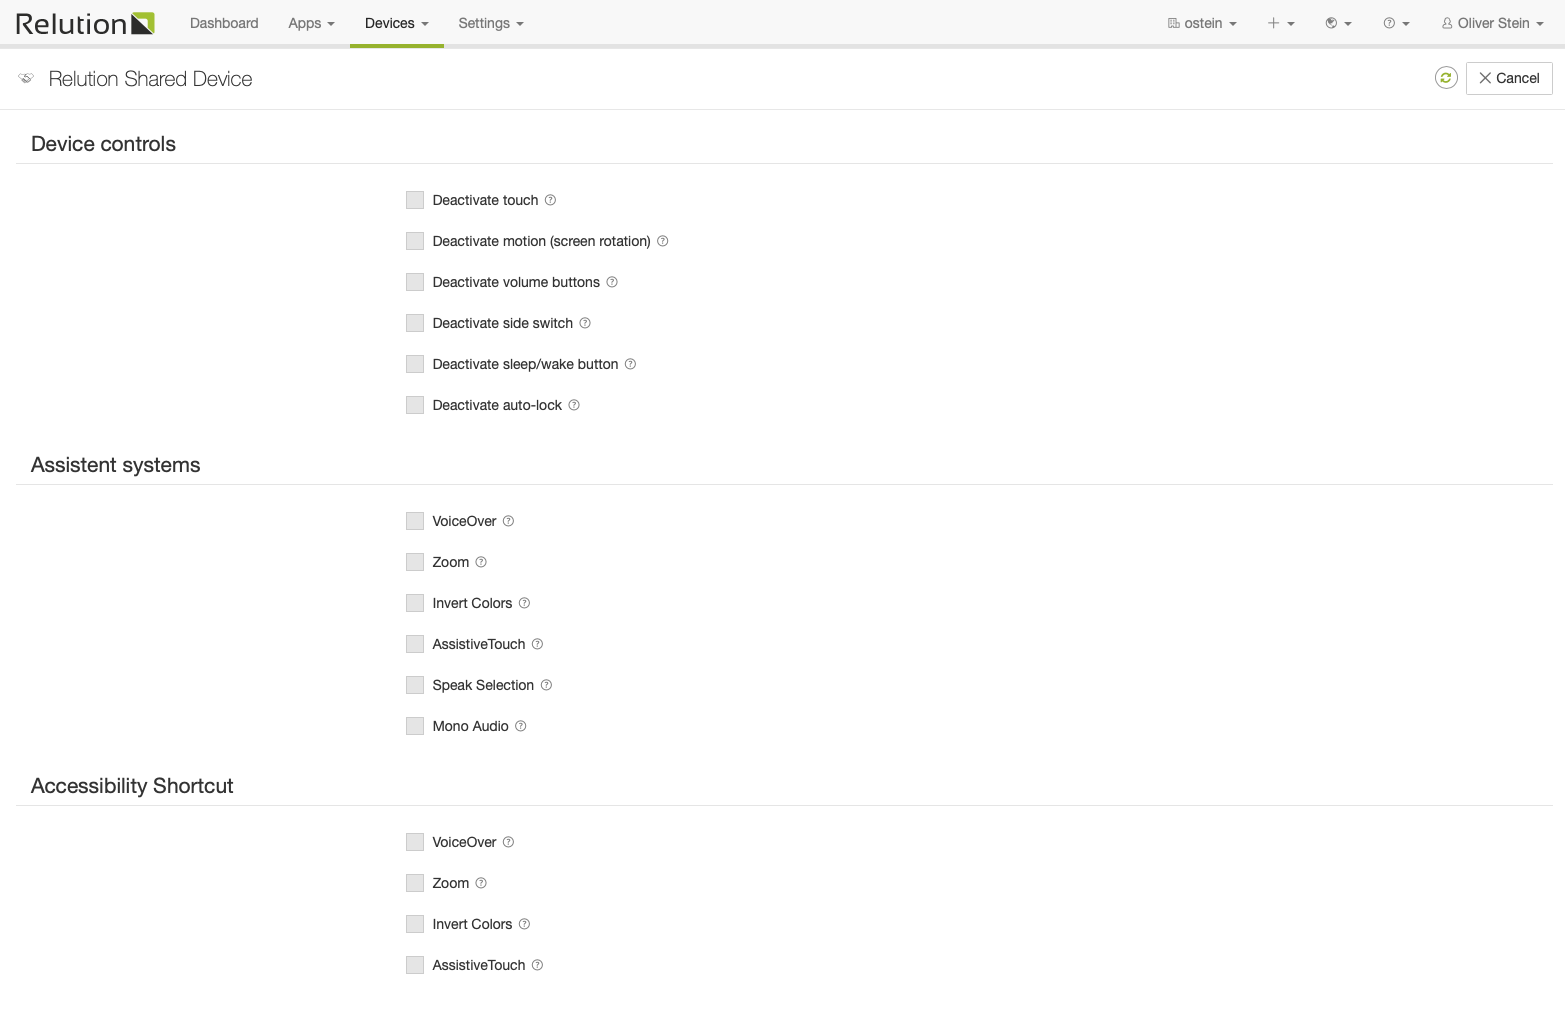
Device controls
-
Deactivate Touch: If set, the touch screen is disabled.
-
Deactivate motion (screen rotation): If set, the device rotation sensing is disabled.
-
Deactivate volume buttons: If set, the volume buttons are disabled.
-
Deactivate side switch: If set, the ringer switch on the side of the device is disabled. When disabled, the ringer behavior depends on what position the switch was in when it was first disabled.
-
Deactivate sleep/wake button: If set, the sleep/wake button is disabled.
-
Deactivate auto-lock: If set, the device will not automatically go to sleep after an idle period.
Assistent systems
-
VoiceOver: If set, allow VoiceOver adjustment.
-
Zoom: If set, allow Zoom adjustment.
-
Invert Colors: If set, allow Invert Colors adjustment.
-
AssistiveTouch: If set, allow AssistiveTouch adjustment.
-
Speak Selection: If set, Speak Selection is turned on.
-
Mono Audio: If set, Mono Audio is turned on.
Relution Shared Device
Here you can configure Relution’s own Shared Device Mode. See this chapter for details:
Relution Shared Device Mode (iOS)
The Relution Shared Device Mode enables the secure use of a device by multiple users. Using Relution’s own authentication mechanism instead of cloud based IDs, it is now possible to share devices in accordance with strict data protection laws. Another advantage is that the Relution Shared Device Mode is activated and deactivated using policies, so that it can be switched on and off dynamically, i.e. for exam use cases.
Requirements
To use the Relution Shared Device Mode, the iOS device has to be running in Supervised Mode.
Functionality
When the Relution Shared Device Mode is enabled on a device, it will show a login screen that cannot be left (i.e. the home button or swipe upwards gesture are disbaled.):
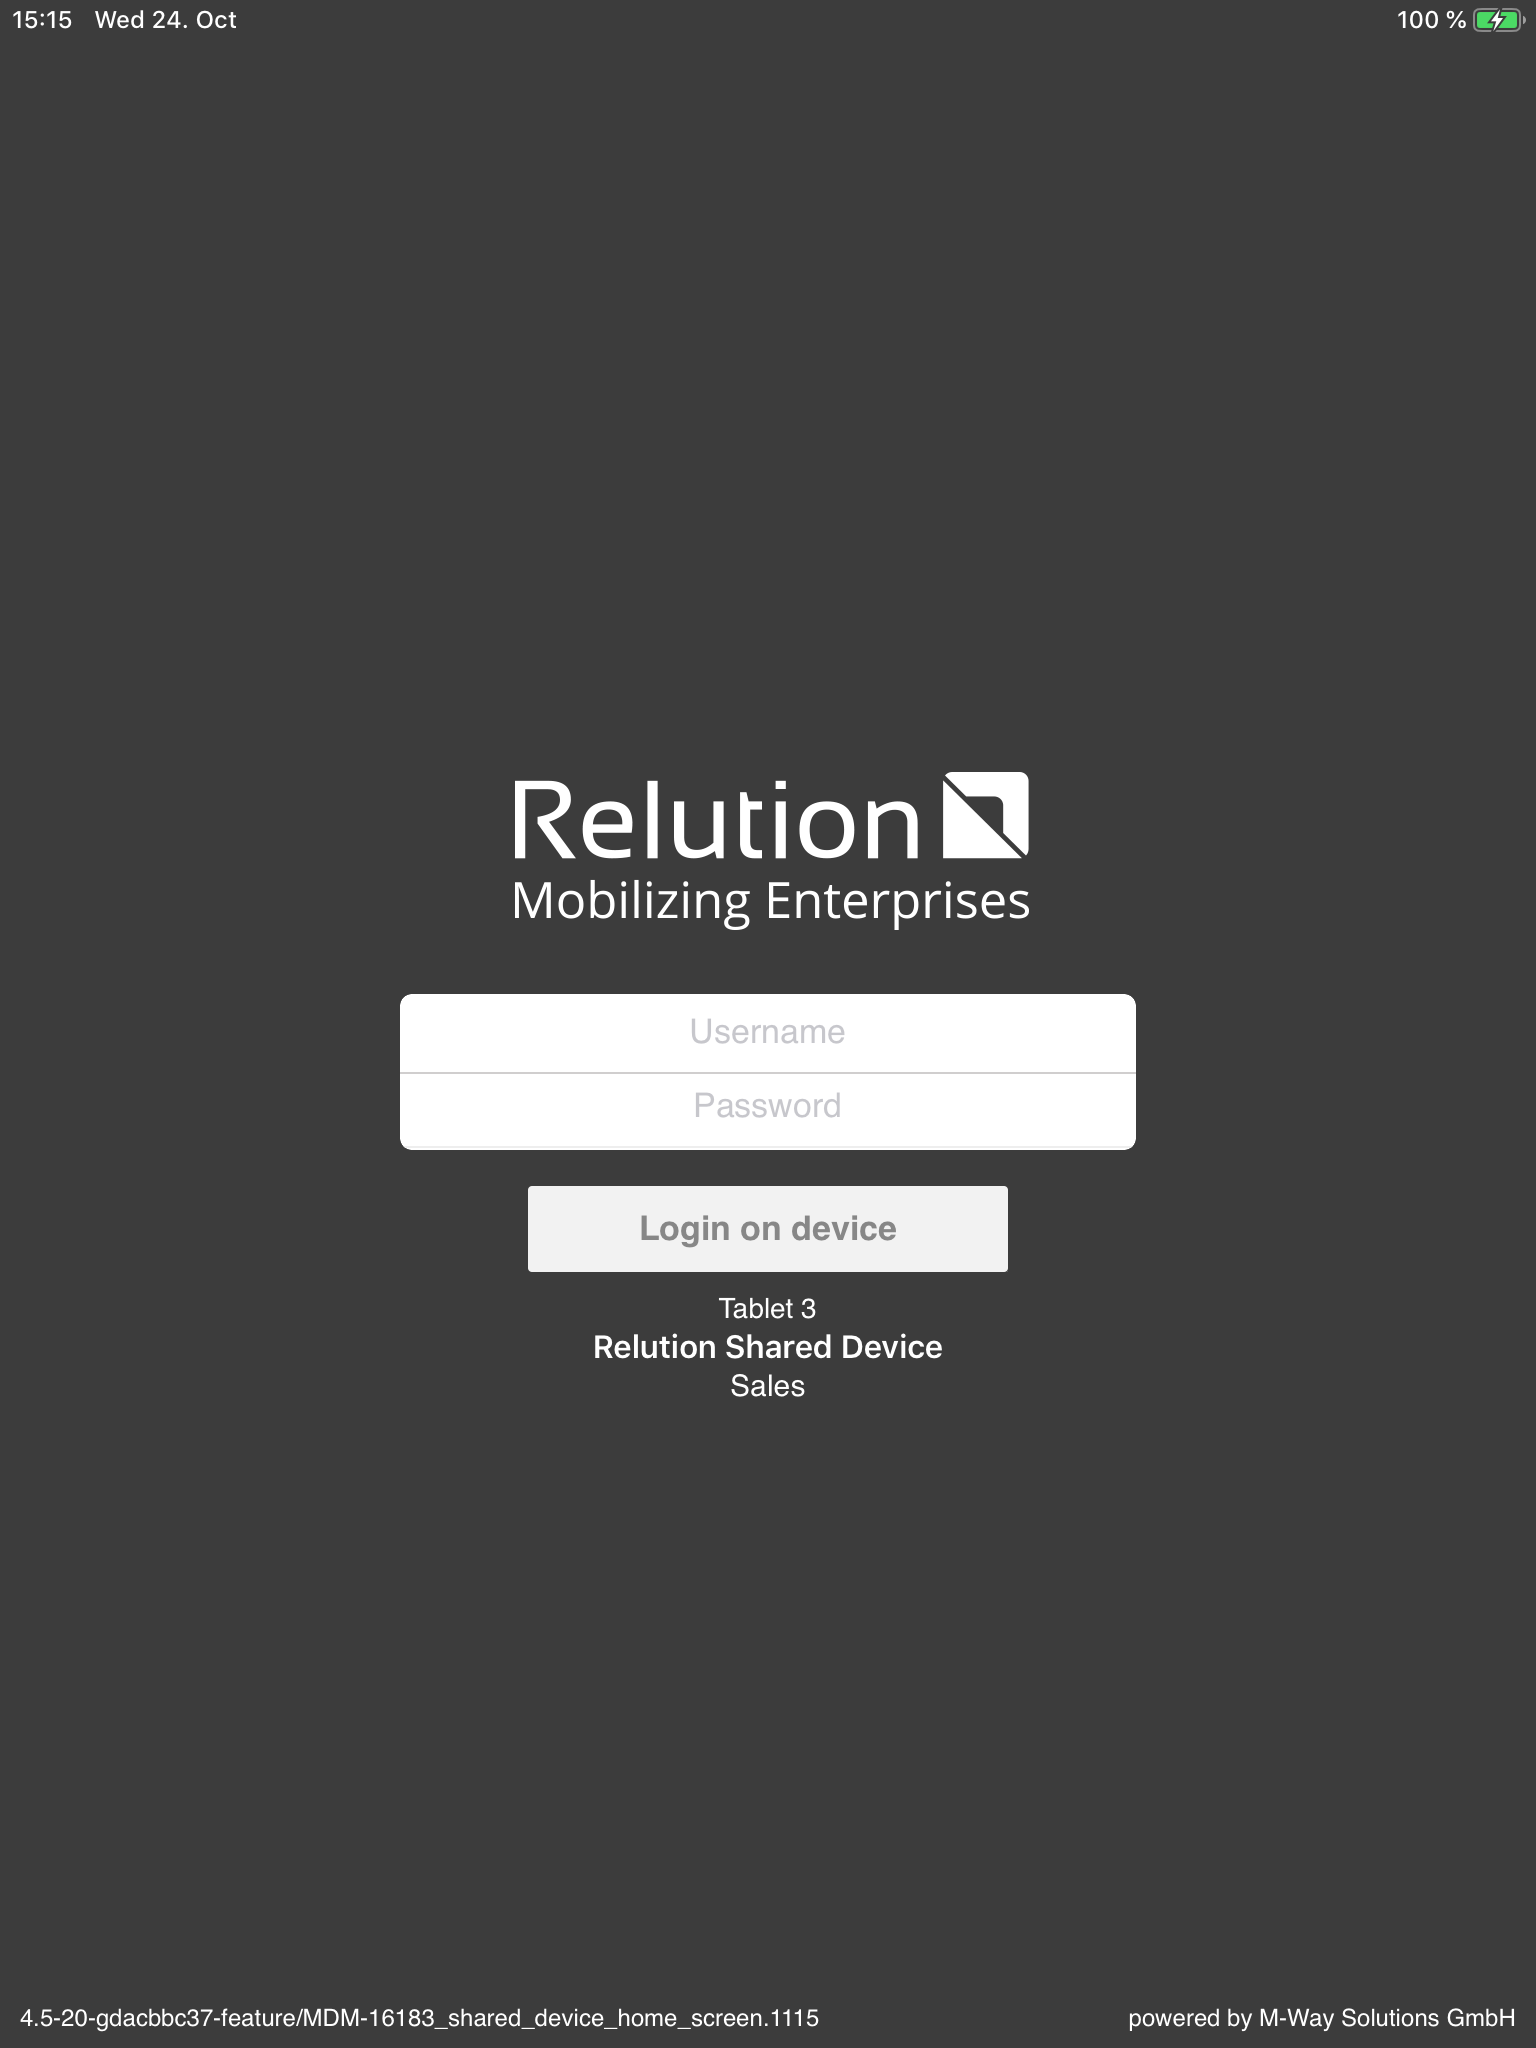
The login will accept any User ID / Password combination known to Relution (either local or LDAP/AD users). Once a user logs in, the login success screen will appear and the device will work normally.
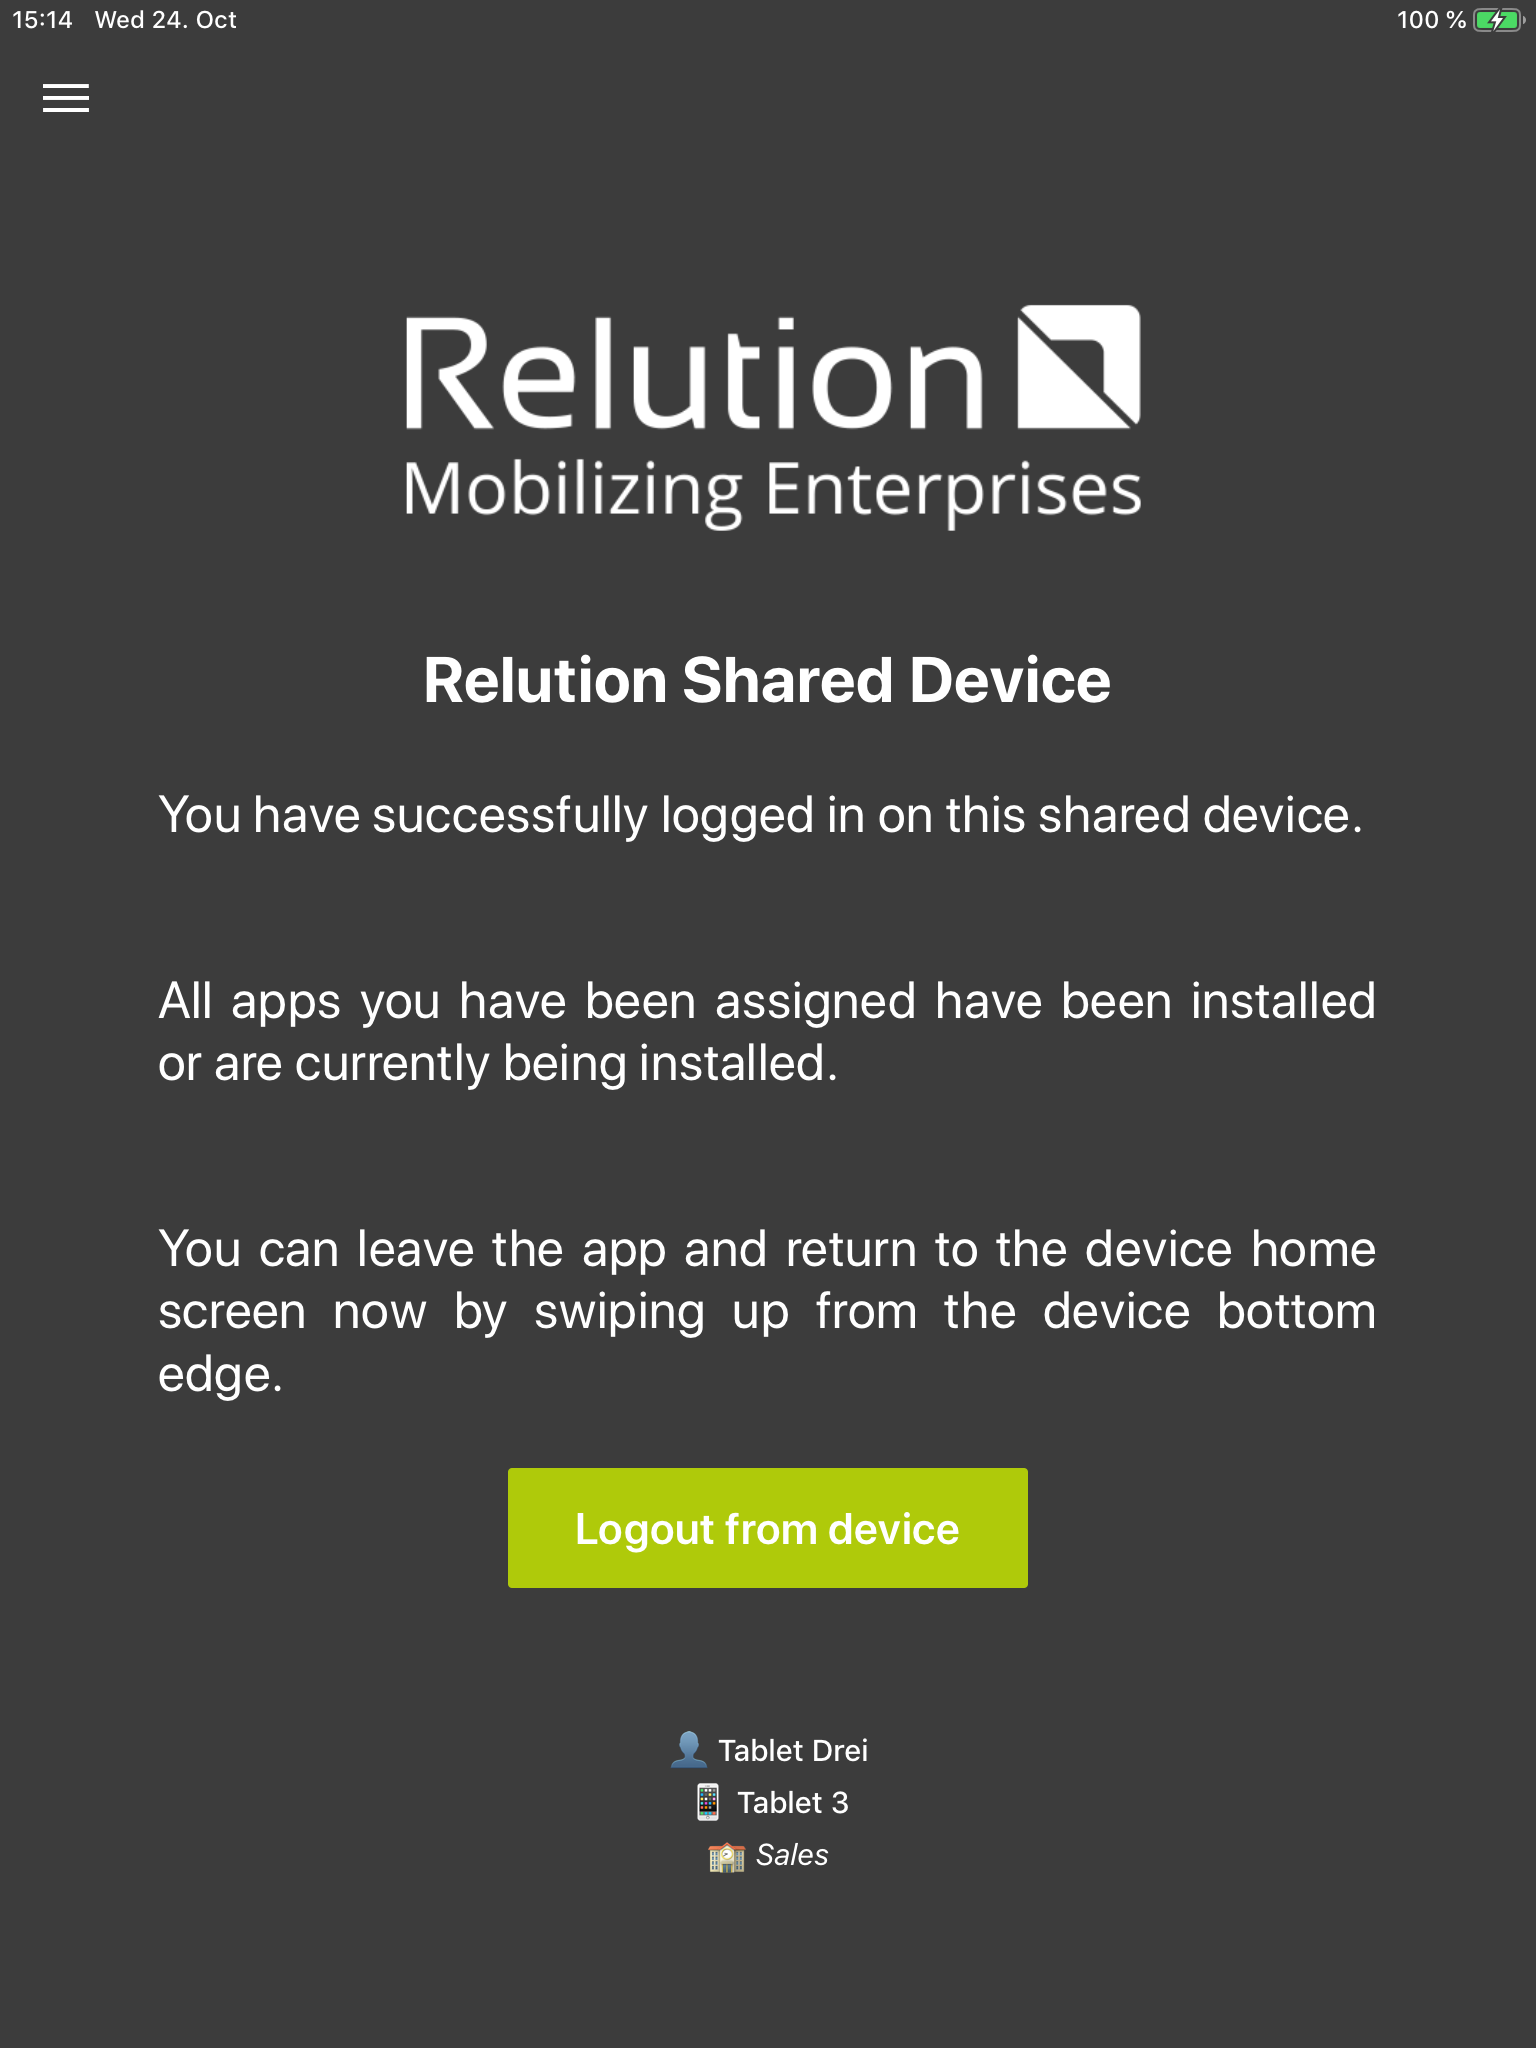
The apps assigned to that user will be installed dynamically and whitelisted (i.e. all other apps are no longer visible).
When the user logs out, the device will lock again and show the login screen.
The apps that were installed during the login will be removed from the device. The Whitelisting will be disabled so all apps are shown again.
Creating a Relution Shared Device policy
This shows how to create a new policy with a Shared Device Mode configuration. It is also possible to add additional configurations or to add a Shared Device Mode configuration to an existing policy.
-
Navigate to Devices, Policies
-
Click on Add
-
Select iOS as platform
-
Enter a name for the policy
-
Click on Save
You have now created a new policy. You should see the Configurations tab, which currently contains zero configurations.
-
Click on Add
-
Select Relution Shared Device
-
Click on Add details
-
Click on Save
You have now added a default Relution Shared Device Mode configuration to your policy. You can now use the Add button to add additional configurations to the policy or click on the Relution Shared Device Mode configuration to customize it.
-
Click on Relution Shared Device to customize the configuration
-
OPTIONAL: Set the check boxes as desired. No changes are necessary. See Configuration options below for details.
-
Click on Save
-
Click on Publish and confirm
-
Go to Devices with this version
-
Add at least one enrolled device to apply the policy on this device
You have now created and published a policy with a Shared Device Mode configuration. You have applied the policy on at least one device.
Configuration options
Device controls
-
Deactivate Touch: If set, the touch screen is disabled.
-
Deactivate motion (screen rotation): If set, the device rotation sensing is disabled.
-
Deactivate volume buttons: If set, the volume buttons are disabled.
-
Deactivate side switch: If set, the ringer switch on the side of the device is disabled. When disabled, the ringer behavior depends on what position the switch was in when it was first disabled.
-
Deactivate sleep/wake button: If set, the sleep/wake button is disabled.
-
Deactivate auto-lock: If set, the device will not automatically go to sleep after an idle period.
Assistent systems
-
VoiceOver: If set, allow VoiceOver adjustment.
-
Zoom: If set, allow Zoom adjustment.
-
Invert Colors: If set, allow Invert Colors adjustment.
-
AssistiveTouch: If set, allow AssistiveTouch adjustment.
-
Speak Selection: If set, Speak Selection is turned on.
-
Mono Audio: If set, Mono Audio is turned on.
Managed App Configurations
Push configurations to managed apps. Choose the bundle identifier of the specific app and insert a valid app configuration payload. IOS 7+ is required. In the payload, you can use the placeholders that can be displayed on the bottom of the page. For example, you can configure an eMail client app by using the placeholder \{$user.email} to make the configuration usable by different users. The placeholders will be filled in when the configuration is pushed to the device.
| The app has to be installed for this configuration to work. If you install the app in the same policy, make sure the app configuration is executed after installing the app by adding it later in the configuration list. |
Here are some examples for managed app configuration payloads:
Microsoft Outlook (com.microsoft.Office.Outlook) for use with Office365:
<?xml version="1.0" encoding="UTF-8"?>
<!DOCTYPE plist PUBLIC "-//Apple//DTD PLIST 1.0//EN" "http://www.apple.com/DTDs/PropertyList-1.0.dtd">
<plist version="1.0">
<dict>
	<key>com.microsoft.outlook.EmailProfile.AccountType</key>
	<string>ModernAuth</string>
	<key>com.microsoft.outlook.EmailProfile.EmailAccountName</key>
	<string>${user.fullname}</string>
	<key>com.microsoft.outlook.EmailProfile.ServerHostName</key>
	<string>outlook.office365.com</string>
	<key>com.microsoft.outlook.EmailProfile.EmailAddress</key>
	<string>${user.email}</string>
	<key>com.microsoft.outlook.EmailProfile.EmailUPN</key>
	<string>${user.email}</string>
	<key>com.microsoft.outlook.EmailProfile.AccountDomain</key>
	<string></string>
	<key>com.microsoft.outlook.EmailProfile.ServerAuthentication</key>
	<string>Username and Password</string>
	<key>IntuneMAMAllowedAccountsOnly</key>
	<string>Enabled</string>
	<key>IntuneMAMUPN</key>
	<string>${user.email}</string>
</dict>
</plist>
Microsoft Outlook (com.microsoft.Office.Outlook) for use with an on-premise Exchange server:
<?xml version="1.0" encoding="UTF-8"?>
<!DOCTYPE plist PUBLIC "-//Apple//DTD PLIST 1.0//EN" "http://www.apple.com/DTDs/PropertyList-1.0.dtd">
<plist version="1.0">
<dict>
	<key>com.microsoft.outlook.EmailProfile.AccountType</key>
	<string>BasicAuth</string>
	<key>com.microsoft.outlook.EmailProfile.EmailAccountName</key>
	<string>${user.fullname}</string>
	<key>com.microsoft.outlook.EmailProfile.ServerHostName</key>
	<string>exchange.server.name</string>
	<key>com.microsoft.outlook.EmailProfile.AccountDomain</key>
	<string>domainname</string>
	<key>com.microsoft.outlook.EmailProfile.EmailAddress</key>
	<string>${user.email}</string>
	<key>com.microsoft.outlook.EmailProfile.EmailUPN</key>
	<string>${user.email}</string>
	<key>com.microsoft.outlook.EmailProfile.AccountDomain</key>
	<string></string>
	<key>com.microsoft.outlook.EmailProfile.ServerAuthentication</key>
	<string>Username and Password</string>
	<key>IntuneMAMAllowedAccountsOnly</key>
	<string>Disabled</string>
	<key>IntuneMAMUPN</key>
	<string>${user.email}</string>
</dict>
</plist>
SecurePIM (com.virtual-solution.securepim-enterprise) for use with Office365:
<?xml version="1.0" ?>
<!DOCTYPE plist PUBLIC "-//Apple Inc//DTD PLIST 1.0//EN" "http://www.apple.com/DTDs/PropertyList-1.0.dtd">
<plist version="1.0">
 <dict>
  <key>license</key>
    <string>your-license-key</string>
    <key>activeSyncServer</key>
    <string>outlook.office365.com</string>
    <key>userEmail</key>
    <string>${user.email}</string>
    <key>activeSyncUser</key>
    <string>${user.email}</string>
    <key>deviceSerialNumber</key>
    <string>${device.serialnumber}</string>
    <key>recipientCertificateEmail</key>
    <string>${user.email}</string>
    <key>allowTouchIDAuthentication</key>
    <string>true</string>
    <key>callKitEnabled</key>
    <string>true</string>
  </dict>
 </plist>
FileBrowser for Education (com.stratospherix.filebrowsereducation) for accessing an SMB share:
<?xml version="1.0" encoding="UTF-8"?>
<!DOCTYPE plist PUBLIC "-//Apple//DTD PLIST 1.0//EN"
"http://www.apple.com/DTDs/PropertyList-1.0.dtd">
<plist version="1.0">
<dict>
  <key>mdm-enforce</key>
  <integer>1</integer>
  <key>lockdown</key>
  <integer>1</integer>
  <key>1displayname</key>
  <string>My NAS</string>
  <key>1domain</key>
  <string>office.mwaysolutions.com</string>
  <key>1flags</key>
  <integer>1746</integer>
  <key>1machinename</key>
  <string>smb://yoursmbservershare/</string>
  <key>1username</key>
  <string>${user.email}</string>
  <key>1vpntype</key>
  <integer>0</integer>
  <key>waitForSearchButton</key>
  <integer>0</integer>
</dict>
</plist>
IBM Verse client (com.ibm.lotus.traveler):
<?xml version="1.0" ?>
<!DOCTYPE plist PUBLIC "-//Apple Inc//DTD PLIST 1.0//EN" "http://www.apple.com/DTDs/PropertyList-1.0.dtd">
<plist version="1.0">
 <dict>
 <key>appConfigOnly</key>
   <string>true</string>
 <key>serverType</key>
   <string>onpremise</string>
 <key>serverURL</key>
   <string>server_url_or_ip_address</string>
 <key>user</key>
   <string>${user.name}</string>
 <key>password</key>
   <string></string>
 <key>restrictClipboard</key>
   <string>false</string>
 <key>disableShareMenu</key>
   <string>false</string>
 <key>disableRemoteImages</key>
   <string>false</string>
 <key>mamKey</key>
   <string></string>
 <key>mamKeyMismatchTimeout</key>
   <integer>24</integer>
 <key>disableAttachmentExport</key>
   <string>false</string>
 <key>mailFilterDays</key>
   <integer>3</integer>
  <key>mailFilterDays.lock</key>
   <string>false</string>
 <key>previewLines</key>
   <integer>2</integer>
 <key>previewLines.lock</key>
   <string>false</string>
 <key>confirmDelete</key>
   <string>false</string>
 <key>confirmDelete.lock</key>
   <string>false</string>
 <key>attachmentFilter</key>
   <integer>100</integer>
 <key>attachmentFilter.lock</key>
   <string>false</string>
 <key>mailThreads</key>
   <string>false</string>
 <key>mailThreads.lock</key>
   <string>false</string>
 <key>useMailSignature</key>
   <string>false</string>
 <key>useMailSignature.lock</key>
   <string>false</string>
 <key>mailSignature</key>
   <string></string>
 <key>mailSignature.lock</key>
   <string>false</string>
 <key>bccMyself</key>
   <string>false</string>
 <key>bccMyself.lock</key>
   <string>false</string>
 <key>calendarPastFilterDays</key>
   <integer>14</integer>
 <key>calendarPastFilterDays.lock</key>
   <string>false</string>
 <key>calendarAlarms</key>
   <string>true</string>
 <key>calendarAlarms.lock</key>
   <string>false</string>
 <key>calendarAudioAlarms</key>
   <string>true</string>
 <key>calendarAudioAlarms.lock</key>
   <string>false</string>
 <key>weekStartDay</key>
   <integer>0</integer>
 <key>weekStartDay.lock </key>
   <string>false</string>
 <key>exportContacts</key>
   <string>false</string>
 <key>exportContacts.lock</key>
   <string>false</string>
 <key>searchCorpDirectory</key>
   <string>true</string>
 <key>searchCorpDirectory.lock</key>
   <string>false</string>
 <key>contactSortOrder</key>
   <string>lastfirst</string>
 <key>contactSortOrder.lock</key>
   <string>false</string>
 <key>contactDisplayOrder</key>
   <string>firstlast</string>
 <key>contactDisplayOrder.lock</key>
   <string>false</string>
 <key>appPassword</key>
   <string>false</string>
 <key>appPasswordType</key>
   <string>numeric</string>
 <key>appPasswordMinLetters</key>
   <integer>0</integer>
 <key>appPasswordMinNumeric</key>
   <integer>0</integer>
 <key>appPasswordMinNonLetters</key>
   <integer>0</integer>
 <key>appPasswordMinUppercase</key>
   <integer>0</integer>
 <key>appPasswordMinLowercase</key>
   <integer>0</integer>
 <key>appPasswordMinSymbols</key>
   <integer>0</integer>
 <key>appPasswordMinLength</key>
   <integer>4</integer>
 <key>appPasswordAutolock</key>
   <integer>30</integer>
 <key>appPasswordExpiration</key>
   <integer>0</integer>
 <key>appPasswordHistory</key>
   <integer>0</integer>
 <key>appPasswordWipeFailures</key>
   <integer>0</integer>
 <key>appPasswordProhibitSequences</key>
   <string>false</string>
 <key>appPasswordProhibitTouchID</key>
   <string>false</string>
 </dict>
</plist>
Home Screen Layout
| The managed device has iOS version 9.3 or higher and is supervised |
The iOS Home Screen Layout configuration allows you to arrange the app icons on the managed devices' home screen. Relution allows two different options how this can be done.
The first one is the grouping of icons based on the category attribute of the apps. If the checkbox Group apps on home screen by category is active and the configuration is successfully deployed on the device, all apps of one category will be put into a folder. The folders are sorted alphabetically on the device, starting with a folder with an Apple icon as name, consisting of all Apple system apps.

| You can create categories under Settings → Categories and define an apps category by selecting an app, navigating to Settings and then choosing the categories you want the app to appear in. |
The second possibility is to arrange all app icons freely. Therefor the Group apps on home screen by category checkbox has to be disabled and a visual editor appears.
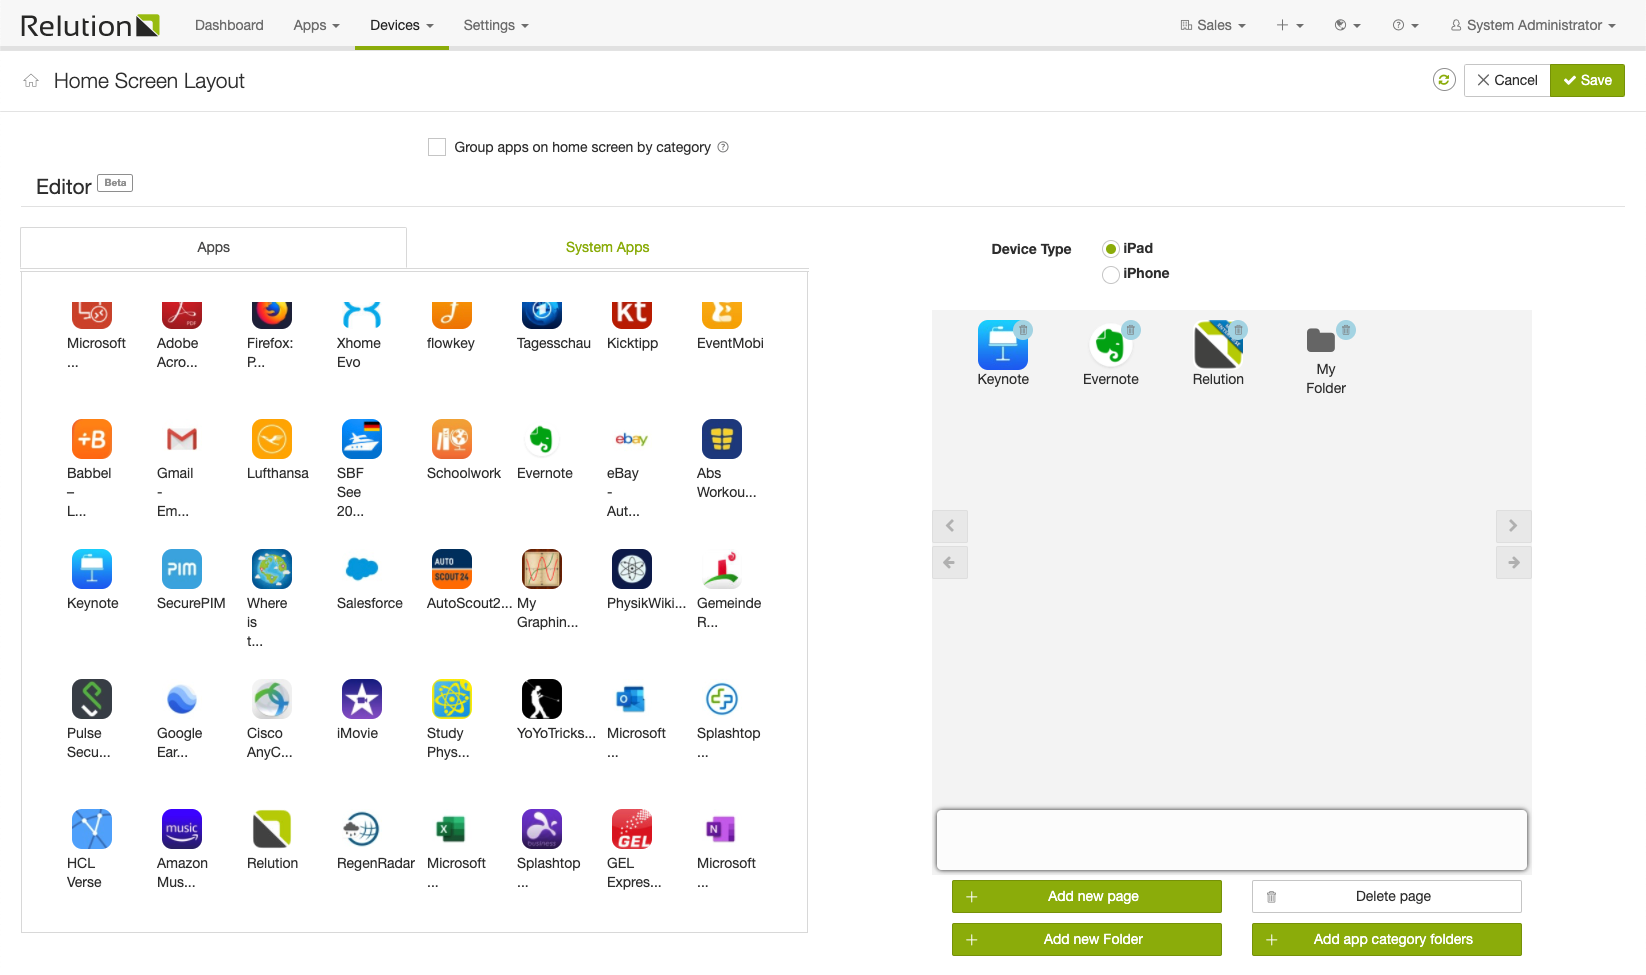
On the left side you will find all available apps divided into Apps and System Apps. On the right side there is a preview of how the layout will look on the device. Now you can simply drag & drop app icons from the left to the right and arrange the icons according to your needs. With the buttons on the right you can ceate and delete new pages and folders. Navigate through the pages with the arrows on the sides and fill them with app icons and folders. The button Add app categories by folder fills the screens with folders each containing the apps they accommodate.
The white box at the bottom of the preview represents the dock, which can be filled with app icons and folders, just like in the main part of a page.
| You can switch between iPad and iPhone layouts. Keep in mind, that an iPad layout only appears on iPads and iPhone layouts only on iPhones. |